Geo Protractor
from KEUWLSOFT
Privacy Policy for Geo Protractor
Currently not available on app stores. Can be downloaded at Buy Me a Coffee (coffee optional).
Supporters on Patreon can find the app here .
Currently not available on app stores. Can be downloaded at Buy Me a Coffee (coffee optional).
Supporters on Patreon can find the app here .
Summary
This app, measures angles between two points on the geo sphere with the camera and augmented reality.
Device orientation is obtained with the accelerometer and gyroscope, or with the accelerometer and magnetic field sensor. Each method has advantages and disadvantages and can be selected with the gyro or magnet buttons (only if your device has the necessary sensors detected).
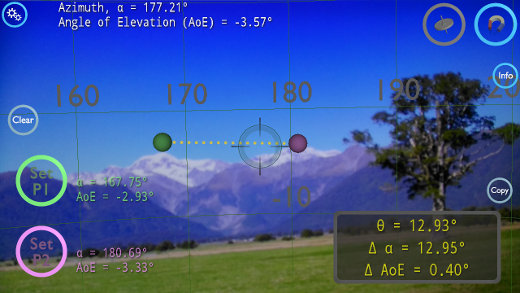
A sphere with azimuth and angle of elevation lines is shown overlaying the camera view.
Two positions can be set putting markers onto the view. The angle required to rotate from one to the other is shown, as is the difference in azimuth and angle of elevation between the two points.
For Indication Only. Note that in gyroscope mode, the azimuth will drift slowly. In magnetic mode, the Earths magnetic field can be distorted by nearby metallic objects and give incorrect azimuth readings. For Indication Only.
Geo Protractor Screenshot |
User Guide
This app is used to measure the angle between two points on the GeoSphere. To use..• Point camera at first location and tap Set P1.
• Point camera at second location and tap Set P2.
• & thats it, a box will appear showing the angle between these points, and also the difference in azimuth and angle of elevation between the two points.
In more detail...
Device orientation is obtained with the accelerometer and gyroscope, or with the accelerometer and magnetic field sensor. Each method has advantages and disadvantages and can be selected with the gyro or magnet buttons at the top right of the screen. Note that whilst most devices have an accelerometer and gyroscope, fewer have a magnetic field sensor. If no magnetic field sensor is detected, you cannot use the magnetic method.
For Indication Only. Note that in gyroscope mode, the azimuth will drift slowly. In magnetic mode, the Earths magnetic field can be distorted by nearby metallic objects and give incorrect azimuth readings. For Indication Only. Gyroscope mode generally gives more stable values. After setting Point 2, I suggest pointing at the first location again to get an idea of how much drift is in the reading. Whilst you may be able to get a repeatable measurement with no drift, the accuracy of the measurement is still unlikely to be better than 5%. In magnetic field mode, it is best to use outside, away from any possible sources of interference. Accuracy will also depend on the quality of the sensors in your device.
Copy - The results are copied to the clipboard so that they can be pasted into another app.
Clear - Removes the setpoints.
Settings - The cogs button (top left) opens up some additional settings. Select between degrees and radians. Turn on or off additional smoothing and adjust the Field of View.
Field Of View (FOV) The field of view is the angle the camera sees between the top and bottom of the screen. This by default will be determined automatically. However unchecking the auto box will allow you to select a different field of view with a slider. Whilst an object at the center of the screen will be at the right coordinates and a setPoint will align with the object. As soon as we rotate away, the object and setPoint may no longer align and the separation increases as we move the object further away from the center of view. Correcting the field of view will fix this. If the set point moves away from the center faster than the object, then the FOV is too small. If the object moves away from the center faster than the set point, then the FOV is too large.
Note, that it is not necessary to correct the field of view for the app to work, since the measurement points are all taken with the objects in the center of the field of view. Or, in other words - changing the FOV does not affect the results.
In summary, For Indication Only. Great for educational use/getting a rough idea of angular separation, but beyond that use a dedicated measuring device instead.