IR Transmit Pattern
The last option on the side bar of the Editor is for setting up the IR pattern that will be transmitted each time a button is pressed.
The IR Transmit settings screen is split into two, with the top half showing a graph and test button,
while the lower half shows the IR settings. The graph can be toggled to large with the down chevron arrow temporarily hiding the IR settings in the process.
Graph
The graph can be set to show time or frequency along its x-axis using the buttons beneath the graph.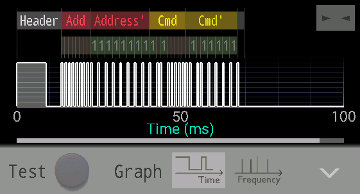
Small Time Graph
Time Graph
The time graph will show the transmission IR pattern from its start to end including any repeats. Time is shown on the x-axis in milliseconds (ms). Note that timing data for the IR settings all use microseconds (µs). 1 ms = 1000 µs.Touch and drag to pan the graph left or right. Pinch with two fingers to change the scale. If the graph is zoomed in, the carrier signal will also become visible. Tap on the button, top right of the graph to fit the data neatly into the graph. The x-axis scale will be changed to show the whole transmission signal.
Depending of the IR format being used to define the pattern, above the time graph will appear more information, such as the location of binary 0's and 1's in the transmitted signal.
Frequency Graph
The Frequency graph shows the frequencies supported by your device in yellow, and the chosen carrier frequency in a dashed blue line. Touch and drag to pan the graph left or right. Pinch with two fingers to change the scale. Tap on the button, top right of the graph to fit the data neatly into the graph. The x-axis scale will be changed to make sure all the supported frequencies and carrier frequency are visible in the graph. The Log and Lin buttons above the graph will change the x-axis scale to be either linear or logarithmic.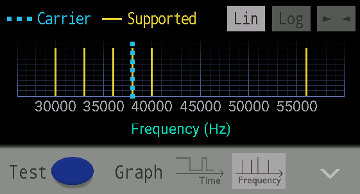
Small Frequency Graph
Test Button
The test button located below the graph will transmit the IR pattern assigned to the button. It is a quick way to test the button without having to go into run mode and back again. The test button will look like the button selected, but at a fixed size. If no button is selected, then there is no test button.IR Transmit Settings
Once a button is selected, its IR transmit settings can be edited.Carrier Frequency
Generic to all formats is the carrier frequency. The carrier will default to 38 kHz since it is the most popular frequency used in IR remotes. The IR tranmission is simply the carrier frequency modulated by the IR pattern. To modify the carrier frequency, just tap on the edit button to the right of the frequency and enter a new one in the dialog that appears. Pay attention to the supported carrier frequencies for your device, which will also be listed in the dialog. If a frequency is chosen that it not supported, the closest supported carrier frequency is used to send the transmission.Format
The format specifies how we are going to define our IR pattern. This could be in the raw format, where we just specify a lot of on and off times, or we could use a well known IR protocol, or perhaps make our own custom one. When a button is first created, the format is set to none and nothing will be transmitted when it is pressed.The format control can be set to one of these options:
The settings for each format are different, and so will be covered separately below.
Note that the maximum IR tranmission length is 2 seconds.
Custom Format
In custom format a command and address combination is sent with custom timing. The data can be encoded using pulse width modulation, pulse distance modulation or Manchester coding by appropriately setting the pulse timing for the 0 and 1 signals. Combined with any start and end pulses, the complete IR pattern is then established.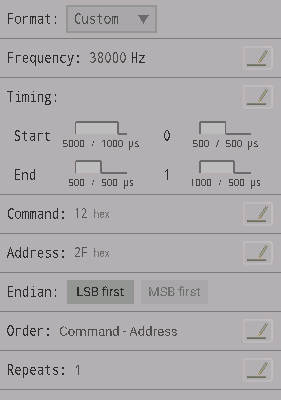
Custom IR Format
Timing
Pulse timing for the start, end, 0 data and 1 data can be edited by tapping on the edit button top right of the timing section. For each item, the high time and low time can be set, along with which should come first. For example, in Manchester coding, the high might come first for a 0 data bit, which would make the low first for a 1 data bit, whilst keeping the high and low times the same.In the timing section, there is a representation of each pulse and the times for the first & second part of the pulse.
If both high and low times are set to zero, there will be no pulse. For example, if no end bit is required, set the high and low times for the end pulse to zero.
Command
The command is data that will be sent using the custom settings. The command can be 0-32 bits in size, and can be entered in hexadecimal, decimal or binary when the command dialog appears after tapping on the edit button to the right of the command section.Address
The address is more data that will be sent with the custom settings, often used to identify the device the IR tranmission is intended for. The address can be 0-32 bits in size, and can be entered in hexadecimal, decimal or binary when the address dialog appears after tapping on the edit button to the right of the address section.Endian
Determines if data is sent Least Significant Bit(LSB) or Most Significant Bit (MSB) first. The order bytes are stored or sent is also referred to as Endian, where Big endian is MSB first and Little Endian is LSB first.Order
Since it is a custom format, there is a choice of which order to send the data. Tap on the edit button to the right of the order section to open up a dialog where the order can be selected. For example, just the command or address data could be sent. Or perhaps the inverse command and address (command' and address') could also be sent like in the NEC format.Repeats
The number of times to send the IR pattern each time. The repeats are combined together to make one longer transmission which should be no longer than 2 seconds in total.Repeats can be set by tapping on the edit button to the right of the repeats section. A dialog will appear where the number of times to send the signal can be selected between 1 and 10. The repeat interval (time in milliseconds between the start of each repeat) can be also be set if a specific timing is required.
NEC Format
Settings to generate an IR pattern based of the NEC protocol.Command
The command is 8 bits of data that can be entered in hexadecimal, decimal or binary when the command dialog appears after tapping on the edit button to the right of the command section. The command usually consists of data which tells the receiving device what function it should carry out.Address
The address is 8 bits of data (or 16 bits if extended) that can be entered in hexadecimal, decimal or binary when the address dialog appears after tapping on the edit button to the right of the address section. The address usually consists of data which identifies which device should receive and act on the transmission.Extended
If extended, 16-bits of address data will be sent instead of just 8. Select by tapping on Yes or No in the Extended Section.Repeats
Repeats can be set by tapping on the edit button to the right of the repeats section. A dialog will appear where the number of times to send the signal can be selected (1 to 10). The repeat interval (time in milliseconds between the start of each repeat) can be also be set if a specific timing is required.The repeat method can either be set to full (the complete pattern is repeated), or to repeat bit (just a single bit that is sent with the header for each repeat after the first full pattern).
JVC Format
Settings to generate an IR pattern based of the JVC protocol.Command
The command is 8 bits of data that can be entered in hexadecimal, decimal or binary when the command dialog appears after tapping on the edit button to the right of the command section.Address
The address is 8 bits of data that can be entered in hexadecimal, decimal or binary when the address dialog appears after tapping on the edit button to the right of the address section.The address usually consists of data which identifies which device should receive and act on the transmission, whilst the command tells the receiving device what function it should carry out.
Repeats
Repeats can be set by tapping on the edit button to the right of the repeats section. A dialog will appear where the number of times to send the signal can be selected (1 to 10). The repeat interval (time in milliseconds between the start of each repeat) can be also be set if a specific timing is required.The repeat method can either be set to full (the complete pattern is repeated), or to without header (the data is sent without the header for each repeat after the first full pattern).
SIRC Format
Settings to generate an IR pattern based of the SIRC protocol.Mode
Select between 12-Bit (5 bit address sand 7 bit command), 15-Bit (8 bit address and 7 bit command) or Extend (5 bit address, 7 bit command and then 0-32 extra bits).Command
The command is 7 bits of data that can be entered in hexadecimal, decimal or binary when the command dialog appears after tapping on the edit button to the right of the command section.Address
The address is either 5 or 8 bits of data that can be entered in hexadecimal, decimal or binary when the address dialog appears after tapping on the edit button to the right of the address section.Extra
Only in extend mode, this is extra data (0-32 bits) that can be entered in hexadecimal, decimal or binary when the extra dialog appears after tapping on the edit button to the right of the extra section.Repeats
Repeats can be set by tapping on the edit button to the right of the repeats section. A dialog will appear where the number of times to send the signal can be selected (1 to 10). The repeat interval (time in milliseconds between the start of each repeat) can be also be set if a specific timing is required.RC-5 Format
Settings to generate an IR pattern based of the RC-5 protocol.Command
The command is 6 bits of data that can be entered in hexadecimal, decimal or binary when the command dialog appears after tapping on the edit button to the right of the command section.Address
The address is 5 bits of data that can be entered in hexadecimal, decimal or binary when the address dialog appears after tapping on the edit button to the right of the address section.The address usually consists of data which identifies which device should receive and act on the transmission, whilst the command tells the receiving device what function it should carry out.
Extended
If extended is set, then one of the start bits of the IR pattern is cleared, thus giving access to a second set of commands or devices.Repeats
Repeats can be set by tapping on the edit button to the right of the repeats section. A dialog will appear where the number of times to send the signal can be selected (1 to 10). The repeat interval (time in milliseconds between the start of each repeat) can be also be set if a specific timing is required.RC-6 Format
Settings to generate an IR pattern based of the RC-6 protocol.Field
A 3-bit field in the IR pattern that is used to select one of 8 modes of the RC-6 protocol. Mode 0, has 8 command bits and 8 address bits. Unsure about the other modes.Command
The command is 8 bits (mode 0, or user definable in other modes) of data that can be entered in hexadecimal, decimal or binary when the command dialog appears after tapping on the edit button to the right of the command section.Address
The address is 8 bits (mode 0, or user definable in other modes) of data that can be entered in hexadecimal, decimal or binary when the address dialog appears after tapping on the edit button to the right of the address section.The address usually consists of data which identifies which device should receive and act on the transmission, whilst the command tells the receiving device what function it should carry out.
Repeats
Repeats can be set by tapping on the edit button to the right of the repeats section. A dialog will appear where the number of times to send the signal can be selected (1 to 10). The repeat interval (time in milliseconds between the start of each repeat) can be also be set if a specific timing is required.Raw Format
Build an IR pattern from a list of high and low times in microseconds. The first value is a high time, the second value a low time and so on.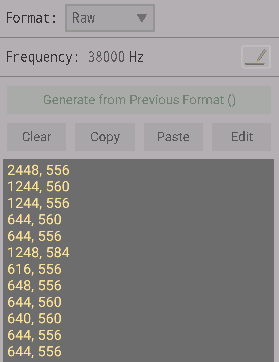
Raw IR Format
There are several ways to generate the pattern.
Generate from Previous Format
If the format has just been changed from a different format, then this button is enabled. Tapping the button will convert the IR pattern from that format into the raw format of times in microseconds.Clear
Tapping on clear, erases the raw pattern data.Copy
This copies the raw pattern data to the clipboard, ready to be pasted into another application.Paste
Analyses the text from the clipboard and converts it, if possible into a usable list of times. To paste normally, open the edit text for the raw data, long press and paste as you would usually.Edit
Opens up a dialog, where the raw times can be edited manually. On returning, the data is re-analysed and formatted ready for use. Comma, space or newline characters can be used for the delimeter separating times.In addition to raw times in microseconds, the editor & paste options will also accept raw pronto code that begins with 0000 and then space separated 32bit hexadecimal numbers. On analysing the pronto code, it is converted to a list of times in microseconds and the carrier frequency adjusted as necessary.