3x3 Cube Solving for Beginners
Part 2: First 2 Layers
At the end of this part, you will have completed the bottom two layers of the cube.
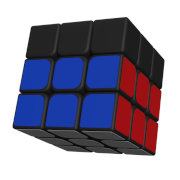
Cube after F2L
In this beginner method, we shall solve a corner piece, followed by the edge piece next to it. We will then repeat at the other 3 corners.
From now on, remember to orient the cube with the yellow center sticker at the top, and white at the bottom. Before each step check yellow is still at the top to avoid getting lost.
Before continuing, we need to learn some move names, as you will need to learn a few algorithms in order to solve the cube.
Move Names
The cube has 6 faces, which we call Left, Right, Front, Back, Up and Down. If we rotate any of these faces clockwise a quarter of a turn, then that move name is simply the first letter of that face. Thus we have the moves L, R, F, B, U and D. If, instead, we rotate those faces anticlockwise, we have the moves L', R' F', B', U' and D'. The prime symbol is used to denote an anticlockwise move.
The six clockwise and anticlockwise face moves are shown below:

Left Face Moves |

Right Face Moves |

Front Face Moves |

Back Face Moves |

Up Face Moves |

Down Face Moves |
Double layer moves are indicated by a lower case letter corresponding to the face being rotated. These moves are the same as the single layer face moves except that the middle layer is moved with the outer face layer. This beginners guide will only use the front face double layer moves:
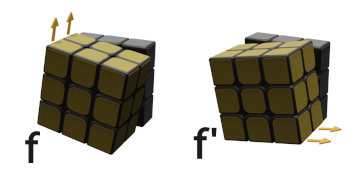
Front Double Layer Moves
If we repeat any of these moves, we perform a half turn, or 180 degree rotation. These 180 degree moves are named by just adding a 2 after the letter for the move. For example, the move R2 would be to rotate the right face twice.
Bottom Layer Corner Piece
First select a corner piece to solve on the bottom layer, and locate the actual location of that piece. We shall use the white, red and blue corner piece for the example. If it is in the bottom, layer, we need to first move it to the top layer (unless it is already solved, in which skip to the middle layer edge piece).Moving the corner piece to the top layer.
Rotate the cube, so the corner piece is in the front bottom right location. Now we can apply move sequences RUR' or F'U'F to bring the piece to the top layer.
| R U R' sequence: |

|
| F' U' F sequence: |

|
Rotating top corner piece
If the corner piece is in the top layer, but its white sticker is facing up, then we need to add an extra step to get the white sticker to one of the sides. If its already on the side, skip this step.First rotate the top layer so that the corner piece is above where it needs to go, and rotate the cube so that the corner piece is at the front right. Now apply the moves RU'R' or F'UF to get the white sticker on its side.
| R U' R' sequence: |

|
| F' U F sequence: |

|
Inserting the corner piece
If not already, rotate the top layer to get the corner piece above where it wants to go, and rotate the cube so that its at the front right. If the white sticker is on the front, we use the sequence URU'R, and if the white sticker is on the right, we use U'F'UF. Both will first rotate the top layer in the direction of the white sticker so that its out the way, bring up the bottom corner slot where it wants to go, rotate the corner piece into that slot and then move it back to the bottom layer.

White sticker on the front |

URU'R to insert piece |

White sticker on the right |

U'F'UF to insert piece |
Solve the Middle Layer Edge Piece
We will now insert the edge piece above the corner piece we just solved.
Locate the edge piece. It will either be in the top layer, or in the middle layer.
Top Layer Edge Piece
If not already, rotate the cube so that the slot where the edge piece wants to go is at the front right. Rotate the top layer so that the edge piece we want to insert lines up its coloured sticker to the center sticker on the front or right sides. Follow the relevant algorithm in the table below:

Stickers aligned on the front |

URUR' then U'F'U'F to insert piece |

Stickers aligned on the right |

U'F'U'F then URUR' to insert piece |
These algorithms are mirror images of each other. Both will bring the corner piece back to the top layer in a suitable position relative to the edge piece, such that the second half of the algorithm will combine the edge and corner piece and insert them back into the F2L slot.
Note that these algorithms can be split into two parts of 4 moves each. The second algorithm is just the first algorithm with the parts done in the opposite order.
Middle Layer Edge Piece
If the side piece is in the middle layer, we need to first get it to the top layer, and then follow the instructions for the top layer edge piece above.If the edge piece is in the correct location, but its stickers are swapped, we need to first move it back to the top layer by replacing it with any of the edge pieces in the top layer by using the same algorithm (minus the first move) for inserting a top layer edge piece. Example:

Edge piece in correct location, but stickers are swapped |

Perform RUR' then U'F'U'F to bring edge to top layer while preserving corner. |
If the edge piece is in one of the other slots, bring it to the top layer in the same way you would a corner piece. Move the edge piece to the front right and use move sequences RUR' or F'U'F. Example:

Edge piece on middle layer |

RUR' will bring the edge piece to the top layer |
With the edge piece now in the top layer, just follow the instructions for inserting a top layer edge piece.
Repeat the corner and edge pieces for the other three F2L slots.
Then move on to part 3: Orientate Last Layer.